Monday, November 27, 2017

The Sweaters of Christmas!

Oh, the sweaters of Christmas, they have been given such a bad rap!

I love Christmas sweaters!
 
It was very special to have a decorated sweater for Christmas as I was growing up! It was even better if they had cute pictures, ribbons, bows, bells and sparkly thread.

Christmas-themed sweaters were first produced on a grand scale, when the Christmas holiday was becoming increasingly commercialized. Initially referred to as “Jingle Bell Sweaters,” the first  sweaters saw decades of popularity. 
Then came the word "ugly" when referring to Christmas sweaters. 
 Gaudy, bad taste, tacky, the more stuff on them the better! People hold parties to celebrate the worst sweaters of the year!
So for fun I created a cute craft activity for children to make their own version of the Christmas sweater. It is one that can also be done with parent help as a family project. 


Decorate the Sweater
 
This adorable Christmas activity includes the cover sheet, 4 different blank sweater templates to use and a parent letter.
When finished, it then becomes a prompt for story writing and telling. It is always fun to see the different methods of creating an ugly sweater!

Also see my other activities for:
 
Maybe you will have a wonderfully ugly sweater of Christmas!
I'm pretty sure I will! 

Tuesday, November 14, 2017

Turkey Races Graphing Using Cube Kleenex Box or Dice Template!

Horizontal and vertical graphing can sometimes be very confusing for little learners, but turkeys can make it a concept easy to understand!

I have created a new turkey version of a similar winter snowman product. It also includes large and small pieces for a better visual understanding of the objective. Learning to do graphing should be a fun unforgettable activity!
This is a creative Thanksgiving or fall turkey horizontal and vertical graphing activity using a Kleenex Tissue box or a cube template to make dice for graphing the different turkeys. It is a favorite with children!

 The product has pieces to do a large floor size graphing activity and a regular sized activity! It works best to print the activity out first, to help you decide, what size you want to make the large graphing grid. (Large graphing grid not included.)
(These are pictures of the large grid, but being used with the snowman graphing activity.)
For the large activity, you will need to create your own large graphing grid, preferably one that can be reused again and again! It can be any size you wish! Plus you will need colored paper to fill the grid squares, unless coloring them in with a onetime use.

You can use any size large piece of paper, heavy vinyl picnic table cover or plastic like a shower curtain and create a large visual floor graph to use with the pieces.
You can also create a large graphing grid on a chalkboard, whiteboard or paper, then carefully taping the pieces on, creating a large wall hands on activity.

There is a page to make your own dice using the turkey dice template, which is tricky for many children! An easier version is to create a large die using the six larger turkeys and a square Kleenex box (Not included.) or cut the small turkeys and glue them to small wooden cubes to create dice. 
Just add the turkeys and colored pieces of paper to fill in the boxes as each turkey progresses in the graph. They can be taped on, but I like to use binder clips to have the turkeys standing up!

Decide which activity you are going to do and if using the color or the grayshade activity. This activity includes 2 different dice pages, 4 different graph pages with two types of graphs, large and small movable turkey pieces and the ending question sheet.
The turkey pictures can be cut apart and put in blinder clips to move with the activity. Children love picking out their favorite turkey to race and quietly cheering them to the finish and moving the big and little turkeys on the big and little graphs! See which turkey is the winner!

There are two different versions of the horizontal and vertical included graphs; one in each has more boxes to color in when doing the activity with older children.

It is important to notice that the turkeys look very similar, so the children need to look very carefully before coloring the box. The children roll their die and color in the correct box on the graph showing the same exact turkey.

This is a wonderful way to have hands on learning activity, especially for little learners being introduced to graphing.
You may want to start by introducing the large graphing activity using only two or three turkeys and gradually add all six. The included paper grids can be trimmed so that only a 2 or 3 grid is used!

This product makes a good visual discrimination practice and evaluation activity, as well as graphing. This activity can be used with individual students, small groups,
the whole class andalso in a center or pocket chart.

 Another activity that can be played by printing out extra turkeys is Concentration.
I also have a similar product called
 I plan on making several other activities with the same concept including the large pieces, as children love them and with practice they can do them without adult help!

I also have a FREE Thanksgiving writing product
Free! Turkey Writing Paper for Thanksgiving-Three Grids and Ideas
Enjoy!
 See my other activities for:
I have a wide variety of other educational fun products to help children learn! I would love for you to Follow to keep updated on new activities, freebies, linkups and so much more!

Sending you best wishes for a wonderful Thanksgiving! 
 

Wednesday, November 1, 2017

Here A Turkey, There A Turkey, Everywhere Turkeys And Turkeys!

Looking for a different and simple way to create the turkey bird with little people?
 
 This project uses pinecones which can be found anywhere that there are evergreen trees. While there are many different kinds of cones, for this activity I used the rounded ones. They have an evergreen tree shape when sitting on their flat bottoms.
After gathering them, I want to make sure that they are free of any tiny hosts that could be
hiding in them. I place them on a foil lined cookie sheet and 
bake at 250 degrees for about 45 minutes.

It makes the house smell like a pine forest!
To make the turkey body turn the cone on the side and glue it to a circle paper base. Allow it to dry for a day before adding the other parts. 

I used a heart punch to create the pieces, but you do not need a punch to do this activity. 
I will explain with two other ideas, so keep reading!
The head is one half of a heart and add a paper beak and waddle from paper scraps. The eyes are wiggly just for fun, but can simply be paper circles from scraps. Make the head completely flat on the table and let dry for a little while. It goes on the front of the cone with the branch pieces called scales sticking out.

The tail feathers are colored papers, but can be printed ones for a different look. They go near the back side of the pinecone between the scales with a touch of glue to keep them in place. See the picture above of the side turkey.

Little touches like hats, bows and fake leaves are not needed, but fun to add.
No heart paper punch, no problem!

A simple way for little people to create hearts is to have them fold a piece of paper in half. They grasp the paper on the folded side with their thumb on the top and pointer finger behind as shown in the picture. Thank you to my husband for letting me use his thumb in the picture!
They can then trace around the thumb or have another child do it, then cut on the line. When they open it, they have a heart! It is such fun to see all the different shapes and sizes of the hearts.

 Another easier way is to have them fold the paper in half and write the number 2 on the fold. Then they only cut the half heart part of the two on the fold and not the tail.
When they open it again there is a heart!
They are always so proud that they have learned how to make hearts and
will remember forever!
A Thanksgiving activity that is fun to do with making these turkeys is to have the child creative spell what they are thankful for and write it on each tail feather. The littlest learners can dictate what they are happy to have and someone can write them on the feathers for them.
This little turkey is thankful for his friends, family, dog, food, house and toys!
What a cute keepsake for the feast table!

Happy Thanksgiving!

Thursday, September 7, 2017

Sequence Sorting Puzzles or First, Next and Last

Learning about sequencing can be fun using this activity!


Here are 15 sets of three puzzle pieces teaching the concept of first, next and last. These are self checking and can be used with the whole class, small groups, or in centers.
These can also be used to write sequence stories for first, next and last, then have the student read them too.

The instruction page has several games to play using these pieces. For example, give each child a puzzle piece, making sure that they each have the matching pieces. The students then scramble to find their matches and put them in the correct order.

These can easily be adapted for the littlest learner by only using the concepts introduced.

Print, laminate, cut apart, and use year after year!
Don’t have time to cut puzzles? You may have a valuable, untapped resource, in your student’s parents! Many parents work and are unable to help with activities or projects in the classroom. This is their time to shine! Simply send home the puzzles after laminating, with directions about how you want them to be cut. The puzzles come back with both the student and parents proud to be involved in helping the teacher!

My other puzzles:
School Compound Word Puzzle Match Set using All School Words
Math Number Sense Interchangeable Mix and Match Puzzles 1-10
Solid Shapes Puzzles
Rhymes Puzzle Match-30 Matches 2 Letter Families
Rhymes 2 Puzzle Match-30 Matches 3 Letter Families
Rhymes Puzzle Match Bundle-60 Matches
Homonym Puzzle Match-30 Opposite Matches
Alphabet Puzzle Match Sounds and Letters
Antonym Puzzle Match-30 Opposite Matches
Go Togethers Puzzle Match
Spring Size Sequence Puzzles
Sequence Sorting Puzzles:First, Next, and Last Tell or Write The Story
Sports Puzzles 0-10
Color Word Puzzles
Time Puzzles 1 Show Hour and Half Hour Practice Clock Included
Time Puzzles 2 Show Quarter and Three Quarter Hour Clock Included
Time Puzzles Bundle
Money Coin Posters, Puzzles, Play Money
Large and Small, and Piggy Banks

Best-selling Solid Shapes Products Bundle
Synonym Puzzle Match-30 Matches
Other Puzzles and Games
 

Friday, July 14, 2017

Sweet Goodbyes!

I am sharing a creative idea to end the day for little learners. It is a fun way to say 
goodbye using dessert words!
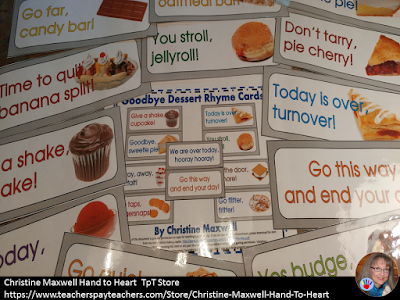
There are 20 card pages with two dessert goodbyes on each sheet for 40 sentences, 4 goodbye sentences without desserts, the title page and a page of directions.

Assembly: Print the pages out on the front side only. The thicker the paper, the more durable they will be, then laminate if desired.

Cards: There are 40 goodbye dessert cards with words and pictures. There are two dessert card sentences to each sheet. These can be cut apart into two separate cards or simply keep them together. The name of the dessert is on each card with a rhyming word for leaving, goodbye, etc. 
Activity: When introducing the activity at the beginning of the year show the children the cards and explain what each dessert is. Read the sentences and discuss the meanings of the different words.

You can also decide or decide together if a movement or motion is to go with each card. For example, “You stroll, jellyroll.” could be a strolling step as they go out the door. “Give a shake, cupcake.” could be a shaking hands motion while leaving. Part of the fun is making up and creating an action that goes with each dessert! 

As the little learners practice the different cards and sayings they will be able to read them, plus they become a learned memory. They will also be able to pick and choose which dessert they might decide to be as they lineup and leave each day, plus doing their own movement or motion out the door!
As the little learners practice the different cards and sayings they will be able to read them, plus they become a learned memory. They will also be able to pick and choose which dessert they might decide to be as they enter each day or lineup and doing their own movement or motion! 

What dessert do they feel like today!

You can use as many or as few sentences as you would like, plus switch them around from time to time!

Another fun idea to share the different desserts during the year, especially for little ones that have never had or heard of certain desserts! Truly a special activity to share!

Enjoy!
 

Sunday, June 11, 2017

Planning For Next Year.....Already!

Is it too early to start thinking about educating little learners for next year?
No!     Yes!    No!    Yes!    No!    Depends.....

It is never too early to start thinking about getting ready for the next group of littles, 
but I may not be ready to act on it yet. It varies from year to year. 

Sometimes I just need a break. 
Other times I am ready to jump right in creating new activities and products! 

Jumping in now!
I have created a fun product to welcome each student.
 What an exciting and fun way to have the children enter or lineup each day!

There are 3 poster pages, 22 card pages with two animal welcomes on each sheet for 44 sentences, 4 welcome sentences without animals, the title page and a page of directions.
Assembly: Print the pages out on the front side only. The thicker the paper, the more durable they will be. Laminate if desired.

Poster: The poster has three parts, simply line them up together. The page with the top line is at the top and the page with the bottom line goes at the bottom. Notice the middle section does not have a top or bottom line. They can be stapled or taped together. You can also not use the middle section and just put the top and bottom together. 
You will need to trim a little off the posters to have the border match exactly right.
Cards: There are 44 welcoming animal cards with words and pictures. There are two animal card sentences to each sheet. These can be cut apart into two separate cards or simply keep them together.

The name of the animal is on each card with a rhyming word of welcome or movement. I have also used the color words red, yellow, green, blue, purple, orange, black, brown, gray, tan and white in some sentences.

Activity: When introducing the activity at the beginning of the year show the children the cards and explain what each animal is. Read the sentences and discuss the meanings of the different words.
You decide or decide together what movement or motion is to go with each card. For example, “You rock, peacock.” could be a fist bump as they come in the door. “High ten, brown wren.” could be two high fives with both hands. Part of the fun is making up and creating an action that goes with each animal!
As the little learners practice the different cards and sayings they will be able to read them, plus they become a learned memory. They will also be able to pick and choose which animal they might decide to be as they enter each day or lineup and doing their own movement or motion! 
What animal do they feel like today! 
Are you ready to jump in?


Thursday, May 4, 2017

Thank An Educator!

Here is a set of free bookmarks for you or someone that you know, that has made a difference in the life of a child or another person.

The Starfish Story
It is a great product for administrators to give to staff members. It can be run on heavier paper and laminated for a lasting keepsake.

There are three bookmarks on the sheet. The poem listed below is centered on each bookmark. There is a set in color and another set in black and white.

THE STARFISH POEM
by Loren Eiseley
Once upon a time there was a wise man
who used to go to the ocean
to do his writing.
He had a habit of walking on the beach
before he began his work.
One day he was walking along the shore.
As he looked down the beach,
he saw a human
figure moving like a dancer.
He smiled to himself to think
of someone who would dance to the day.
So he began to walk faster to catch up.
As he got closer, he saw
that it was a young man
and the young man wasn't dancing,
but instead he was reaching
down to the shore, picking up something
and very gently throwing it
into the ocean.
As he got closer he called out,
"Good morning! What are you doing?"
The young man paused,
looked up and replied,
"Throwing starfish in the ocean."
"I guess I should have asked,
why are you throwing starfish in the ocean?"
"The sun is up and the tide is going out.
And if I don't throw them in they'll die."
"But, young man, don't you realize that
there are miles and miles of beach
and starfish all along it.
You can't possibly make a difference!"
The young man listened politely.
Then bent down, picked up another starfish
and threw it into the sea,
past the breaking waves and said-
"It made a difference for that one.“

You make a difference!

Friday, April 21, 2017

My May Days!

 May 1st, often called May Day, just might have more holidays than any other day of the year. It's a celebration of spring. It's a day of political protests. It's a saint's feast day and a day for organized labor. In many countries, it is a national holiday.
As a little girl, I would hang small baskets of flowers on the doors of family and friends in my neighborhood, bringing in May to celebrate the return of spring.

We continued this tradition when our daughters were toddlers. My husband and I were lucky enough to live just down the road from my husband's parents. The day before May Day, we made little homemade baskets with colored papers.
 Simply trace a half circle using a plate to create the little cone baskets and cut it out. Then cut a strip of paper from one side to make a handle. Curve the straight edge of the paper in half over itself to form the cone shape needed to make the basket.
Glue or staple the edges of the basket together, plus add the handle by fastening it to 
each side of the basket. Ribbons or bows can be added, but are not necessary.
This project is so easy peasy to do!
The girls were always so excited waiting for May 1 morning to arrive! They picked whatever small flower bouquet they wanted from dandelions to lilac flowers. We would sneak down to Grandma's house hoping she wouldn't see us. The girls would tiptoe up to the door, hang their baskets of love, ring the doorbell and run to hide.

Of course, Grandma was always excited to see those adorable little baskets! She would play like she didn't know the two special little people that placed them on her door. This only lasted for a few seconds because the girls were too excited to stay in their hiding places. Every year Grandma would be totally surprised and there would be lots of hugs and kisses!
 I also used this activity with my little learners, making little baskets the day of May 1 or the day before, then sending them home. They tended to fill their baskets with lots and lots of dandelions! They came to school with delightful stories of how they shared their May Day baskets with family, friends or neighbors. Occasionally a little one would forget, then rush home after school to do it!

The stories they created while writing down what happened were full of happiness and a joy to hear being shared with the class! Every year it was a treasured teaching project!

 Wishing you a very special May Day!

Saturday, March 4, 2017

Puzzles, Puzzles and More Puzzles

Puzzles are such a fun way to introduce, practice and evaluate learning skills! I have many available for different learning concepts, but the most popular one is
 They can easily be adapted for a variety of ages. Start the littlest learner by only using concepts introduced and starting with very simple examples!

The instruction page has several games to play using these pieces. For example, give each child a puzzle piece, making sure that another child has the matching piece. The students then scramble to find their match.
Print, laminate, cut apart, and use year after year!

Don’t have time to cut puzzles? You may have a valuable, untapped resource, in your student’s parents! Many parents work and are unable to help with activities or projects in the classroom. This is their time to shine! Simply send home the puzzles after laminating, with directions about how you want them to be cut. The puzzles come back with both the student and parents proud to be involved in helping the teacher!
Most of my puzzle activities have curved corners to keep children from being poked. I know it takes longer to cut them out this way, so if you are in a hurry simply cut them straight across for square edges!

I have a free product that give you a chance to use some of the different puzzle activities I have available.
This free product has 42 puzzles that include the concepts of solid shapes (cone, cube, sphere, and cylinder), hour time (12:00-5:00), antonyms or opposites, rhyming, homonyms/homophones, time sequence, size sequence, and things that go together.
Enjoy!

I have many other types of activities like this, just look under
Puzzles and Games.
Related Posts Plugin for WordPress, Blogger...